NMG2 Open source editor help

V0.25 BETA

  1. NMG2 Open source editor help
    1. Introduction
    2. Intended public
    3. Requirements
    4. Installation
      1. Step one : installing Libusb-win32
      2. Step two : installing the NMG2 OS Editor
    5. Feature list comparison
    6. Main screen layout
    7. Shortcut keys and menu's
    8. Additional functionality
    9. JAWS compatibility
    10. Midi control of editor functions
      1. Ctrl midi ports
      2. Assigning midi control to knobs  and buttons
      3. BCR settings
    11. Patch manager
      1. Upload bank to disk
      2. Download bank to G2
    12. Patch browser
    13. G2 VST
      1. Installation of the VST
      2. Setup of the VST and editor
      3. G2 VST functionality
    14. Remote control
      1. Setup of the server editor
      2. Setup of the client editor
    15. System exclusive operation
    16. Extra modules: driver and resonator
    17. Message log
    18. Used sources and packages

Introduction

The Nord modular G2 is a virtual modular sythesizer system. It consists of a hardware synthesizer (key model or engine model) and an editor. In the G2 system the editor is used to make patches in the style of modular synthesizer, so by adding modules, oscilators, filters and so on. and connecting them by cables. In the G2 system this is all done in the editor on a computer connected to the G2 using an USB interface. The resulting patch can be downloaded to the G2 after which the G2 systhesizer can be used on it's own, without the editor or computer.

Clavia (today Nord Keyboards) discontinued the G2 in 2009, there are a lot of people however who wish they had developed the G2 system further, because it's a great synth.. What I personally like about the G2 is that it's a great system to learn about sound synthesis but it is also a high quality instrument.

Because I'm more a software developer than a musician, I got interested in the software part of the G2 system also. With the help of others (see used sources and packages), this eventually led to a open source project for an alternative G2 editor. Contrary to the original editor, the open source editor is not at it's development endpoint. Although we cannot change the sound system of the G2, because that is build into the firmware, there is still some functionality that can be added to the system through the open source editor. You can read about a couple of examples in this help file.

The goals of the project are to have an editor that has at least all the functionality of the original one, and to extend the life of the G2 system for as far as it depends on the editor..

This help file contains the the install instructions. A comparison of the functionality of the original editor and the open source one and descriptions of functionality not found in the original editor.

I hope you will find this open source editor usefull!

Bruno.Verhue, 2011-2012, Delft.

Intended public

The project is still in it's "Beta testing" stage, which means that is not a finished application. You might run into bugs and installation involves a bit more than clicking through an installer. So if your not an experienced Windows user, I would advice to wait untill the application is a bit further in its developement, because you at least have to know what a dll is and what a driver is and where these files belong on a Windows system.

Otherwise, if you are an expericenced Windows user and you own a G2 please try this editor and let me know what your experiences are, because that's the whole point of beta testing!

Requirements

For the moment there is only a Windows version. It should work on XP, Vista and Windows 7.

Installation

At the moment there is no installer so installation involves downloading a couple of packages, unzipping and copying some files to the appropriate folders. It isn't very dificult, I'll descripe the necessary steps in this section.
The two packages you need are:

- Libusb-win32, you can download the latest version here: http://sourceforge.net/projects/libusb-win32/files/libusb-win32-releases/
- nmg2_editor_bin_0.xx.zip, which you can download here: http://sourceforge.net/projects/nmg2editor/files/

(If you want the version of the editor including all source code, you should download the nmg2_editor_srce.zip)

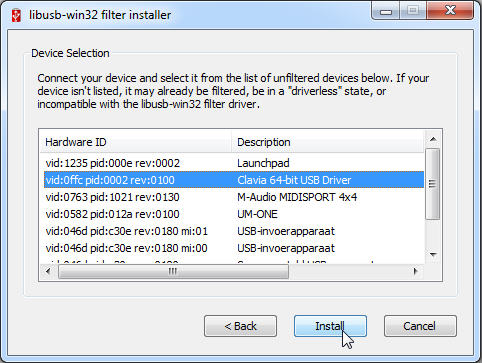
For full functionality of the editor you need to install Libusb-win32, but you can aslo install only the editor. In that case you can skip step one and go directly to step two. The editor without the usb functionality lets you load/save patches, edit patches, convert them to another format (fxp, sysex), analyze them in the log window, or upload/download them to the G2 using sysex.

Step one : installing Libusb-win32

The libusb-win32 package contains the libusb-win32 open source generic usb driver. It has a very usefull feature for this project, the "filter-driver" option, which allowes you to use both the original Clavia editor and the open source editor. The only limitation is that you can not run both editors at the same time.

So, first of all, you have to intall the Clavia USB driver, and the Clavia editor, if you haven't already done that. (By the way, if you have troubles installing the Clavia USB driver like I had, try installing it in Windows "Safe mode").

Next, download and unzip the Libusb-win32 package. Go to the "bin" folder, there you will find a text file with installation instructions.


There is also a "inf-wizard.exe" file in de bin folder, that file we are not going to use, because when you install the inf-version of libusb, it will replace the Clavia USB driver and you won't be able to use the original editor anymore (unless you uninstall everything and re-install the Clavia USB driver).

So read the "libusb-win32-bin-README.txt". To give you an example, I have an amd64 system, so I had to do 3 things:

- Copy and rename x86\libusb0_x86.dll to Windows\syswow64\libusb0.dll
- Copy amd64\libusb0.sys to Windows\system32\drivers\libusb0.sys
- Copy amd64\libusb0.dll to Windows\system32\libusb0.dll

Probably best to restart your computer at this point.

Next, go to the appropriate subfolder of your system. There you will find the "install-filter-win.exe".


At this point you have to connect and switch on your G2, so the driver will be visible in the wizard. Then you can start "install-filter-win.exe".


Choose "install a device filer", then "Next".


Select the Clavia USB driver from the list, then "Install".


Install succesfulll, press "Ok".


Back in the select USB Device window, press "Cancel", or if you have multiple G2's install it on the other one also.

Step two : installing the NMG2 OS Editor

That's the Libusb-win32 installed. Next download and unzip nmg2_editor_bin_0.xx.zip. You'll find these files in the folder. You should be able to run the G2_editor_D2011.exe directly from the folder. Just to make sure, you could restart your computer and the G2.


As you start the open source editor, you will probably get a Windows firewall warning like this (this one is in Dutch, but your window will look similar):


Don't worry that it's trying to install virusses or anything. Windows gives this warning because it detects that the application opens a TCP-IP port. The editor has a TCP-IP port so it can communicate with the G2-VST. So you can allow the program access through the firewall.

After allowing the editor access, it should start and look something like this:


Feature list comparison

This feature list is an extraction of the Clavia G2 manual. I've indicated with an X which functionality is already implemented in the OS editor. Most of the function will wok the same in the OS editor as in the original editor so you can use the Clavia G2 manual for these functions.

Feature Clavia editor Open source editor Differences OS editor
Runs on Windows X X
Runs on Mac X -
Runs on Linux - -
Main screen See Main screen layout
Toolbar X X Seperate Synth toolbar and slot toolbars
Perf: (name) X X On patch manager window
Master Clock X X On Synth toolbar
Slot buttons X X Click on slot toolbar
Connection indicators X X On Synth toolbar
Perf X X On patch manager window
New X X File menu
Init 1&2 X X File menu
Module Group selectors X - Right click patch window to add modules, or "Add" menu
Module Icons X X On add module popup
Patch Load, Cycles and Memory X -
Undo & Redo X X Only undo
Color X X On Editor tools window
Morph groups X X
Patch Name X X
Category X X On patch manager window
Voice Mode X X
Variation X X
Var Init X X
Patch Level X X
Visible cables X X On Editor tools window
Hide all cables X -
Shake cables X -
Patch window split bar X X Position isn't updated yet when switching slots

Popup menus in the editor
Patch window popup X X Not complete yet
Module popup X X
Parameter popup X X
Cable popup X X
Select popup-X
Add popup-X

Working in the editor
Create a new empty Patch window X X
Add modules to a Patch X X
Rename a module X X
Move a module X X
Delete a module X X
Replace a module X -
Coloring a module X X
Connecting modules X X
Edit module parameters in a Patch X X
Voice Area and FX Area X X
Download a Patch to the synthesizer X X Patch manager window
Store a Patch X X Patch manager window
Delete a Patch X X Patch manager window
Creating Patch parameter Variations X X
Save a Variation X X
Copy a Variation X X
Variation Init X X
Edit parameter in all variations-XButton on slot bar
midi control of Variations X X CC#70
Knobs and controllers X X
The Parameter Pages window X X
Assign a parameter to a knob X X
Assign all module parameters to a set of knobs X X
Parameter overview window X -
midi controllers X X
Auto assign midi controllers X -
Morph groups X X
Assign parameters to a Morph group X X
Deassign parameters from a Morph group X X
Edit parameters in a Morph group X X
Copy a Morph group to another source X -
Morph groups in separate Variations X X
Keyboard Morph and Pitch Stick morph X
The Editor and Performances
Performance mode and Patch mode X X
Uploading a Performance to the Editor X X
Creating a Performance in the Editor X X
Keyboard Split (Keyboard Range) X X
Keyboard range and G2 panel split function
Combining Split and Layer X X
The Global Parameter Pages X X
Storing a Performance X X
Storing in the synth X X
Saving on the computer X X
Renaming single Patches in Performances X X
Extracting Patches from a Performance X X
Extract a Patch and store it in the synth X X
Extract a Patch and save it on the computer X X
Deleting Performances in the synth X X
Exiting Performance Mode X X
Patch mutator X -
Patch adjuster X -
Additional functionality
Jaws screenreading software compatibility-XExperimental stage See Jaws compatibility
Midi control of editor functions-XSee Midi control of editor functions
Patch manager-XSee Patch manager
Patch browserXXSee Patch browser
G2 VST-XSee G2 VST
Remote control-XSee Remote control
System exclusive operation-XSee System exclusive operation
Extra modules! driver and resonator-XSee Driver and resonator
Message log-XSee Message log

Main screen layout

The main screen of the open source editor has a different layout in comparison with the original editor. 

The main screen is layed out as follows, from top to bottom:
  1. Main menu bar
  2. Application settings bar, with the following controls:
    1. Online checkbox, indicates if the USB connection with the G2 Synth is active
    2. Clients connected, indicates if VST's or other editors are connected to this editor
    3. Master clock (not Jaws compatible)
    4. G2 synth selection radio button. If multiple G2's are connected with the editor (not Jaws compatible)
  3. Settings bar slot A (not Jaws compatible)
    1. Patch name
    2. Variation selector
    3. Init variation button
    4. Edit parameters in all variations button
    5. Volume slider
    6. Mute button
    7. Number of voices selector
    8. Morph knobs and buttons
  4. Settings bar slot B (not Jaws compatible)
  5. Settings bar slot C (not Jaws compatible)
  6. Settings bar slot D (not Jaws compatible)
  7. Patch location VA (see clavia documentation)
  8. Splitter
  9. Patch location FX (see clavia documentation)
  10. Status bar

Shortcut keys and menu's

The shortcut keys and for the most part the same as in the original clavia edtor. Some shortcut keys and a number of popup menus are added to be comapitble with "Jaws" screenreading software.
A number of sections and dialogs in the application are not Jaws compaitble at the moment.

File Menu
There are no shortcuts in the file menu.
Edit menu and shortcuts
Ctrl + Z Undo
Ctrl + X Cut
Ctrl + C Copy
Ctrl + V  Paste
Del  Delete
Alt+V Copy variation popup menu
Alt+M Edit module properties
Alt+P  Edit parameter properties
Other editting keys
Arrow Up  Increase selected parameter value
Arrow Down Decrease selected parameter value
Ctrl + Arrow Up Increase selected parameter morph value
Ctrl + Arrow Down  Decrease selected parameter morph value
Selection menu and shortcuts
S Slot selection popup menu
Patch location selection popup menu
M Module selection popup menu
P Parameter selection popup menu
E Cable selection popup menu
Ctrl + A Select all modules
Other selection keys
1..8 Select variation 1 to 8
F Select patch location FX
V Select patch location VA
A..D Select slot A to D
Arrow Left Select previous parameter of module
Arrow Right Select next parameter of module
Shift + Arrow Left  Select module left
Shift + Arrow Right  Select module right
Shift + Arrow Up  Select module up
Shift + Arrow Down Select module down
Add menu and shortcuts
Shift + M  Add new module to patch popup menu
Shift + E  Add new cable to module popup menu
View Menu
Ctrl + P  Patch settings (not yet Jaws compatible)
Ctrl + F  Parameter pages (not yet Jaws compatible)
Ctrl + B  Patch manager (not Jaws compatible)
Ctrl + B Patch browser
Ctrl + N  Patch notes (not yet Jaws compatible)
Midi sysex shortcuts
F1  Get active patch sysex
F2  Get active performance sysex
F3  Get patch sysex from bank
F4 Get performance sysex from bank
F5  Send patch sysex
F6  Send performance sysex
Settings Menu and shortcuts
Ctrl + G Synth settings (not yet Jaws compatible)
Ctrl + R  Performance settings
Application settings (no shortcut)

Additional functionality

The following sections explain the additional functionality that is currently present in the open source editor.

JAWS compatibility

The JAWS compatibility is someting I started together with a blind musician, this functionality however is only in it's experimental stage. It will need a lot more research and also some new ideas to make this work. I think it would be a great project  for some student or university to undertake. The challenge is how to build a user interface to facilliate a blind person to make or analyse something as complex as a G2 patch. With a real modular system you can at least feel your way around the system and build a kind of mental picture how the patch is layed out, with the G2 there is only a picture on a monitor.

There is software available that reads out screen content or puts it on a braille reader, for example "JAWS". This screen reading software recognizes Windows objects, like edit boxes, comboboxes, checkboxes, menus etc. and extracts text from it that it reads out or puts on a braille reader. So if your software is build out of Windows objects, it should, in theory, be JAWS compatible.

Unfortunately, in the editor, the whole patch area is pure graphical, no Windows objects. So to make the editor more JAWS compatible I've added a number of menu's and popup menu's. These menu's are Windows objects so are JAWS compatible.

The important thing here is that you can perform all important functions with menu's and shortcut keys.

Important:

Menu's containing pictures or icons are not read out by Jaws. So for compatibility of Jaws, in the Application settings dialog, tab "Editor" the checkbox "Only text menus" should be checked.

Application menu, tab Editor, checkbox "Only text menus" should be checked

So here is an example patching using only menu's and shortcut keys:

Creating a new patch and selecting slot and patch location

 1. Press Alt key to go to the main menu bar, select "File menu", "Init patch" to create a new patch
 2. Press A to select slot A
 3. Press V to select patch location VA

Adding an OscB module to the patch

 4. Press Shift+M, the "add module" popup menu appears.
    ( Modules are grouped in pages, so first a page must be selected and then the actual module )

 5. Press Arrow down until page "Osc" is selected
 6. Press Arrow right, submenu with al the oscilator modules appears
 7. Press Arrow down to select "OscB"
 8. Press Enter to add a module of type "OscB" to the patch

Adding an 2-Out module to the patch

 9. Press Shift+M to add another module
10. Press Arrow down until page "In/Out" is selected
11. Press Arrow right, to open the submenu with the input/output modules
12. Select module "2-Out" and press enter to add the module to the patch

Selecing a module

13. Press M, the "select module" popup appears
14. Press Arrow down until page "Osc" is selected
15. Press Arrow right, to open the submenu with all the oscilators in the current patch location
16. Select module "OscB - OscB1" (that's module type - module name)

Adding a cable

17. Press Shift+E, the "select cable" popup appears with all the connectors of the current module
18. Press Arrow down to select connector "Output Out"
19. Now the destination module must be selected, press Arrow right to open the module selection submenu
20. Select module page "In/Out"
21. press Arrow right and select module "2-Out1"
22. Press Arrow right to select a free input connector of the "2-Out1" module, select "input InL"
23. Press Enter, you shoud hear a sound now on the left speaker

Modifying a parameter

24. Select OscB1 ( M - Arrow down - Arrow down - Arrow right - Enter)
25. Press P, the parameter popup menu appears
26. Press Arrow down to select parameter "Course, value +0 +0"
27. Press Arrow up/Arrow down to change the parameter value

Deleting a cable

28. Select OscB1
29. Press E. the select cable menu appears, it shows all connectors of the current module that have cables
30. Press Arrow down to select connector "Output out"
31. Press Arrow right, the submenu with all cable destinations appears
32. Select cable "Connected to 2-Out1, input InL"
33. Press Arrow right, the submenu with cable options appears
34. Press Arrow down to select option "Delete cable".

Midi control of editor functions

The G2 engine obviously has the disadvantage that you have no knobs and buttons to manipulate parameters like the G2 keys has. Of course you can assign midi controllers to patch parameters in the standard way, but you have to do that for every patch and it's a bit of a drag. Since I am an engine owner, I've been looking for ways to better integrate my midi controller with my engine so it works more like a G2 keys.

What I've come up with, I'll explain in this section, basically it's control of the editor using midi.

This has nothing to do with the standard G2 functionality of controller assignment to parameters, you can still do that, also with the os editor. These assignments are stored in the patch, and will work with or without your G2 connected to a computer.

The controler assignmenst desribed in this section only control the editor, specifically the parameter pages window, so these will only work when the G2 is connected to the computer and the editor is running. The G2 engine will mostly be used in a studio environment, so I guess will be connected to a computer most of the time anyways.

I'll give the example here how I use my BCR2000 to control my engine.

Ctrl midi ports


First you have to check which midi ports you want to use for control of the editor. You can assign more than one controller. The midi ports that are used for sending/receiving sysex from the G2 (tab Midi sysex) are disabled for midi control.

You can also check a midi out port, if your controler can process midi. For example, the bcr2000 has leds around the rotary controls and on the buttons, so by sending control midi from the editor to the bcr2000, the new value of the parameters will be indicated by the leds, if you switch between parameter pages.

Could be with some controllers that you exeperience a "midi feedback loop", in that case you beter disable the Ctrl midi out.


Assigning midi control to knobs  and buttons


The parameter pages window is basically a representation of the knob section of a G2 keys. To be able to control some more functions, I hav added some controls on the parameter pages window that the original editor doesn't have, namely a slot selection button group, variation selection button group and a function selection button group (params, global params, morphs and patch params). These controls are all "Midi aware".


Back in the application settings window, tab Ctrl midi there is a button "Mapping". When you push that button, an informattion window will appear called "Editor UI midi mapping", it shows the mappings that are already there, but also a little pink box will appear on all the controls in the application that are Midi aware, so these can be assigned to a controller. The boxes containing a number are already assigned. For example C45 is assigned to controller #45 and N94 is assigned to note #94. Boxes without a number are not assigned.


Assignment is done by a "Midi learn" function, so turn a knob on the controller and then right click on the control you want to assign. A popup window will appear with the posible options, could be "Assign ... to ..." or also the option "Deassign ..." if the control already had an assignment.


If you choise assign the controller value will be shown in de pink box. Try turing the knob on the controller, the knob on the parameter pages should move with it.


The nice thing about it is, that if you switch to another parameter page, the parameter under the knob will change but the knob will still be assigned to the same CC (CC#40 in this case), just like on the G2 keys.


You can also assign button or note controllers to the buttons and buttongroups, also using the midi learn function.

BCR settings

I'll give an example how I set up my BCR. Maybe there are better ways, but it's mainly to show you have to setup the buttons a certain way so the midi feedback function will work properly.


Button group Midi Data Type Channel Parameter Value1 Value2 Controller MODE Controller Option Display function G2 Function
Encoder group 1 (Buttons 4)
Rotary encoders (1) CC 1 40..47 0 127 ABS Bar On Parameter pages Knobs
Buttons (2) Top row CC 1 48..55 127 0 T ON - On Parameter pages buttons
Buttons (2) Bottom row 1..5 CC 1 32..36 127 0 T ON - On Select param page
Buttons (2) Bottom row 6..8 CC 1 37..39 127 0 T ON - On Select param page column
Push function encoders (8) CC 1 56..63 127 0 T ON - On Select variation
Buttons (9) CC 1 105..108 127 0 T ON - On Select param page function (params, global, morph patch)
Encoder group 2 (Buttons 4)
(Is a copy of encoder group 1, only different function for the push function of the encoders)
Push function encoders (8) 1..4 CC 1 101..104 127 0 T ON - On Select slot
Push function encoders (8) 5 CC 1 60 127 0 T ON - On Patch manager Enable slot on/off
Push function encoders (8) 6 CC 1 61 127 0 TON - On Patch manager slot keyboard on/off
Push function encoders (8) 7 CC 1 62 127 0 T ON - On Patch manager slot Hold on/off

Patch manager

The patch manager gives a visual representation of all the memory locations of the G2 that can hold patches or performances. The top section consists of five slots, one for a performance and four patch slots, these reprsent the working areas of the G2. The bottom section shows 8 performance tabs and 32 patch tabs with each 128 locations that represent the internal memory of the G2. In between the working areas and the memory locations are a number of controls, that basically are the performance settings of the G2.

The idea is that you can drag patches and performances around between memory and working area and also that you have all the controls on one window to quickly audition patches and assemble a performance.


To give you an example of how this works, I'll assemble a performance. First right click on the performance slot and select "Init performance" to create a new empty performance. You can see that you also have the options to load and save the current performance from and to disk in this popup menu and to rename the performance.


Then, in de memory section I select the tab patches, and drag a couple of patches to the empty slots. So in this case I want to layer two pads and assign them to the upper part of the keyboard and I want to have a base sound on de lower part. So I drag a pad to slot A and B and a base sound to slot C. Then I put "Keyb. range" on. Then I select slot A, make sure that "Keyb." is on and with shift key held down I select the upper part of the keyboard (keys turn blue). Same with slot B. For slot C I select the lower part of the keyboard.

The keyboard control has a double function, you kan use it to select a keyboard range for the slot, or to play notes.

The patch category row (with all the different colors) also has a double function, it's color shows what category patch s stored in all the different memory locations, but you can also drag a categroy over a slot, to assign the patch in that slot to the category.


So after I have assembled the performace, I rename it using the right click popup menu and drag it to a performance memory location.


If you right click on the memory section, you also get a popup menu with a number of functions. You can upload the patch in that memory location to the different slots. You can save the complete bank to disk or restore the bank from disk. You can clear the memory location or clear the entire memory bank.


I'll show here how you can save a bank by uploading it to disk and restore it againg by downloading it to the G2.

Upload bank to disk


If you choose "Upload bank to disk", you will be shown a file save dialog, to save the patch list. It is best to reseve an empty folder for this patch list file, because apart from the patch list, all patches will be saved in this folder too.


So after saving it, the folder will hold a patchlist file and all the patches.


Download bank to G2

To restore the bank, first select the bank number to which you want to restore, right click to open the popup menu and select "Download bank to G2".


You will get a lload file dialog, in which you have to select the patch list file that you want to restore,


You will get a warning message. The patches will be restored starting from location one. So if the patch list contains 30 patches, the first 30 memory locations will be overwritten. Contrary to the G2 bank restore function, the rest of the bank locations will not be cleared. If you want that, you have to clear the target bank before restoring the patch list.


After pressing Ok, you will see an hourglass for a minute, than the bank will be restored.


Patch browser


The patch browser is a utility for searching through your performance and patch library on disk. You can also use it to search through the patches/performances in internal memory of the G2 in simple list form.

To use the browser you first have to enter the "root folder" of you patch library on disk in the "Application settings" window. When searching for patches and performances the browser will search through all the subfolders of the rootfolder recursively.


If you open the patch browser you'll see four tabs:

- Perf. (disk) : this will list all performances on disk, relative to the root folder
- Patch (disk) : this will list all patches on disk, relative to the root folder
- Perf : the peformances in the G2's internal memory
- Patch : the patches in the G2's internal memory

If you click on the list header (Patch file, Date, Path...), the list will be sorted according to that column.

If you double click a patch or performance or press Enter, the patch or performance will be loaded in the G2. Patches are loaded into the currently selected slot.


There is also an option for parsing the patches on disk, so that some extra information can be extracted from the patch and shown in the list. For this you have check the checkbox "Parse patches". An extra four columns will appear in the list:

- ParseMsg : when an error occurse while parsing the patch, this will be shown in this column
- Version : the version of the patch file
- Category : the patch category
- Patch notes : patch notes, if any, will be shown in this column

This function only works for patches at the moment, not for performances.


Another option is to filter the patches that have certain modules in them, for example if you are searching for examples how to use the "Filter phase" in combination with a "Freq shift", you can select these modules using the button "Select modules". An selection window will appear. Check the modules that must be present in the result patches, then press Ok.


The patchbrowser will parse all patches relative to the root folder containing a FltPhase and a FreqShift module, resulting in 29 patches in this example.


G2 VST


The G2 VST is a Steinberg virtual instrument for use in a DAW, for example Cubase or Ableton. The benefit of a Vst is that you can embed G2 patches and all paramers into the DAW project, so if you reload a project in your DAW, all G2 patches and parameters will be restored automatically also.  Of course you can also automate parameter changes.

In order to communicate with the G2 from within a DAW, there has to be some way of access to the USB interface. My first attempt was to give the VST it's own USB interface, but I because of complexity and stability issues I've chosen another approach: the VST will comunicate with the OS editor using a TCP connection and the editor will forward these messages using the USB interface.

This approach has a number of advantages:

- The G2 VST user interface can be kept simple (no patch editing in the VST)
- You can edit patches in the editor and these changes will be automatically reflected in the VST and vice versa.

One thing you have to keep in mind though:

- Before starting your DAW, you first have to start the OS editor!

The VST has only been testen for Cubase and Ableton for the moment.

Installation of the VST


The installation of the VST is fairly simple, you have to copy these three files to your DAW's VST folder:

- G2_vst_D2011.dll
- ModuleDef.xml
- ParamDef.xml


The "ModuleDef.xml" and "ParamDef.xml" are needed for the editor also, so don't move them, but copy them.

Setup of the VST and editor

The VST and the editor have to communicate with each other, so we have to set up a port and a TCP-IP address, this is done in the "Application setings" dialog of the editor, tab "TCP-IP".

First of all, there is a checkbox "Is server". If checked, then the editor is setup as a server and the VST can connect with it as a client. So this checkbox should be checked.

Next there is a Port setting. The default setting of the port is 2501. It could be however that port 2501 is already in use on your computer. You will get an error message like "Could not bind socket. Adress and port already in use." on startup of the editor. In that case you will have to change it to someting else, for example 2502. After changing the port number, restart the editor!

Next, the "Host" setting will be disabled, because you can only change this setting if the editor is not setup as a server (see section "Remote control").

If you had to change the port setting, than you have to create an "Ini - file" for the VST, because the VST also has the default port setting of 2501 build in. So, if for example, you changed the port to 2502, press the button and an ini-file will be created in the same folder as where the editor exe file is located.


Copy the file "G2_VST_ini.xml" also to your DAW's VST folder.


G2 VST functionality

So now start the OS edtor, if you haven't started it alread and start your DAW, there should be a VST present named "G2_vst_D2011".


which means If you activate the G2 VST, you will see an user interface that's basically the global parameter pages of the editor, including four slots with variation controls. If all has gone well, the bottom bar will show your TCP-IP settings and the text "Online" which means that there is a connection with the editor. There could also be an error message here, if for example the TCP-IP settings are not set up correctly.


On the top bar of the editor you will see that there is currently one client connected.


If you would try to close the editor at this point, you will get a warning: "There are 1 G2 clients connected to this server, do you really want to close the connection?". Because the G2 VST cannot operate without the editor running.


Next load a patch in a slot.


The name of the patch will appear in the corresponding slot of the VST.


Assign the parameters of a module to a Global parameter page.


The parameters will appear on the knobs of the VST.


Now to automate parameters, that may be depended of the type of DAW you are using. I'll give the example of how it's done in Ableton. For example I want to automate variation changes and parameter Freq and FilterType.

On the ableton VST window I have to press the "configure" button.


And then, push or change the button or knob you want to be able to automate, these will the appear in the Ableton VST window.


After that you can just automate them as with any other VST or Ableton instrument.


Any change you make in the editor will automatically be changed in the VST also. For saving the patch in your DAW project, you don't have to do anything special, just save the project.


On reloading the project, the patch will be restored in the editor automatically.

Remote control


In stead of a VST as a client to an editor acting as a server, you can also connect an other editor as a client. This functionality is still a bit experimental, but it could be used in future to run an editor on a wireless device like a tablet.

Setup of the server editor

The server must have an USB connection to the G2. The setup of the server is basically the same as with the VST, so in the application settings dialog, tab TCP-IP, the checkbox "Is server" should be checked and a TCP-IP port should be specified.

You should also set the parameter "Broadcast leds interval (ms)", this limits the amount of led and volume indicator messages that the server receives from the G2 and broadcasts over the network to connected clients. This stream of messages is to big for most wireless networks to handle, so by setting the value to for example 500ms, the server will only broadcast the led and volume indicator messages every 500ms and throw away all the messages in between.


Setup of the client editor


To test this functionality you could make a copy of the os editor folder, and in the copied folder edit the "G2_editor_ini.xml" file manually, for example in Notepad.


Change the setting "Is server" to "False" in the ini file.


If the server editor is running, you can now start the copied editor setup as a client. Every action you do in the one editor should be mirrored in the other editor.


The TCP-IP settings of the client in this example are

- Port = 2502
- Host = 127.0.0.1 (local host)

If the client and server are running on different computers, the Host value should be changed to the IP-adress of the server computer in the network.

System exclusive operation

If for some reason or another there is no USB connection set up between editor and G2, there is still some functionality available using MIDI and system exclusive messages (sysex). You can upload and download patches and performances from and to the G2 and you can even build new patches.

If you start the editor without the Libusb-win32 driver installed you will get a message "libusv0.dll not found, USB functions are disabled".


And then another message saying "No g2 device found".


Nonetheless, the editor will start, the editor will be offline as indicated by the checkbox.


So first the midi ports for Sysex communication must be set up, this is done in the "Application settings" dialog, tab "Midi sysex". These are the midi ports that are connected to the physical midi in and midi out ports of the G2.


WARNING : Some midi devices can only be accessed by one application at a time. So if for example you tried to connect such a device in the editor and it's also already used by your DAW. the editor might freeze up. The "Midisport" I'm using here can be accessed by multiple applications at once.

So After the Midi sysex ports are set up, sysex communiction must be possible between editor and G2. For easy access to the sysex functions, they are mapped to the function keys F1...F6

F1 - Get the active patch
F2 - Get the active performance
F3 - Get a patch from a bank
F4 - Get a performance from a bank
F5 -  Send patch sysex
F6 - Send performance sysex


Working this way with the editor is a bit like groping in the dark, but I'll give an example how it works here.

So by pressing F1 the currently active patch for the slot is uploaded from the G2 to the editor. In this case it's an empty patch, so nothing much happens,. I only see the volume indicator moving and the patch name going blanc.


So next I patch up some modules, making sure it will make a sound, and the press F5. There should be some noise comming out of the speakers.


I can turn a knob, but the change will only be heard after I press F5 again, same thing if I would increase the number of voices in the patch.


You get the idea, so basic patching functions are still possible using only sysex. Sysex mesages can be viewed using the message log, see section "Message log"


Extra modules: driver and resonator

While working on the editor I discovered a couple of modules that are present in the G2 firmware but not in the original Clavia G2 editor. I have added these modules to the OS editor, you will find them in the oscillator group the one is called "Driver" and the other "Resonator".


I'm afraid I'm not much help explaining these modules, because I'm not an expert in music theory. Hopefully people will start to use these modules and we can learn there full potentional. Here is a little example I put together. The driver/resonator pair is mostly used to simulate acoustic instruments, you can also get some reverb like sounds out of them. I'd say, just experiment!


If you save patches or performances containing these modules, the editor will add an "x" to the file externsion, so patches with these modules will be saved with the extension ".pch2x" and performances with ".prf2x". This is to prevent association of these files with the original Clavia editor. The original Clavia editor considers patches containing these modules as corrupt.

Message log


For debugging purposes there is a message log that can be activated or deactivated in the Application settings. For activation of the message log the checkbox "Log enabled" on tab "General" should be checked. If checked all USB messages or SYSEX messages will be logged, but loading of performances and patches will be significally slower. To keep the message log size manageable, led indicator messages and volume indicator messages are nog logged.

The message log is important for bug reporting. If you find bugs in the editor, it will help a great deal if you can reproduce the error with the message log enabled, save it to disk and post it on the NMG2 OS Editor thread on the electro-music forum, or on the source forge site.

Another use of the message log is to investigate the purpose of certain messages, because there are still lot of messages that haven't been decoded yet.


You can view the log using menu Settings, View Log.


There are three buttons on top of the window:

- Save log file : to save the log file to disk
- Refresh : to refresh the log
- Clear : to clear the log

On the bottom there is a function to manually enter a USB message for the G2 and send it with button "Send Msg". To be able to use this function, you first have to understand how messages are structured.  Although its a bit outdated, you can read a bit how messages are structured here http://www.bverhue.nl/G2dev/G2_messages.html;

To give an example, when a module is moved, the following message is send to the G2.

For sned messages, the first two bytes of a messages represent the message length and the last two represent a checksum number. In the log file, for messages that are send, the size is still zero and the checksum not calculated yet. This calculated just before the message is send over USB. So in this example:

Byte (Hex)Meaning
00Message  size (determined on actual send)
00Message size (determined on actual send)
01Command type (80 = init, 01 = normal command)
29First nibble 2 - editor expects and respons message from the G2. Second nibble 9 - Indicates slot B
00Patch version counter (increased every time you load a new patcs in a slot)
34Command for moving a module
01Patch location (0=FX, 1=VA)
01Module ID
01Column
09Row
CCChecksum (not shown)


To manually send a message, you have to enter the bytes of the message as hexadecimal values seperated with a space, without the message length and without the message checksum. So in above example the module will be moved two columns to the right.

All the known messages are implemented in the source code file "g2_mess.pas".

There are still quite a few messages of which the meaning is unknown or which I don't know yet how to interpret. The following table gives an overview of what is known and unknown at the moment.

Command codeMessageStatusMeaning
$01Unkown
$02Q_SYNTH_SETTINGSKnownQuery synth settings
$03S_SYNTH_SETTINGSKnownSend synth settings
$04Q_ASSIGNED_VOICESKnownQuery no of assigned voices
$05R_ASSIGNED_VOICESKnownReceive number of assigned voices
$06Uknown
$07Uknown
$08Uknown
$09S_SEL_SLOTKnownSend select slot
$0AS_RETREIVEKnownSend retreive patch from bank
$0BS_STOREKnownSend store patch in bank
$0CS_CLEARKnownSend clear bank location
$0DR_STOREKnownReceive store response message
$0ES_CLEAR_BANKKnownClear bank
$0FUknown
$10Q_PERF_SETTINGSKnownQuery performance settings
$11C_PERF_SETTINGSKnownPerformance settings chunk
$12R_CLEAR_BANKKnownReceive clear bank response
$13R_LIST_NAMESKnownReceive bank patch list
$14Q_LIST_NAMESKnownQuery bank patch list
$15R_CLEARKnownReceive clear bank location response
$16R_ADD_NAMESPartly knownSub message bank patch list
$17S_PATCH_BANK_UPLOADKnownSend bank upload message
$18R_PATCH_BANK_UPDLOADKnownReceive bank upload response message
$19S_PATCH_BANK_DATAKnownSend bank upload data
$1AUknown
$1BUknown
$1CS_ASS_GLOBAL_KNOBKnownSend global knob assignment
$1DS_DEASS_GLOB_KNOBKnownSend global knob deassignment
$1ES_SEL_GLOBAL_PAGEKnownSend select global parameter pages
$1FUknown
$20Uknown
$21C_PATCH_DESCRKnownPatch description chunk
$22S_ASSIGN_MIDICCKnownSend midi cc assignment
$23S_DEASSIGN_MIDICCKnownSend midi cc deassignment
$24Uknown
$25S_ASSIGN_KNOBKnownSend knob assignment
$26S_DEASSIGN_KNOBKnownSend knob deassignment
$27S_PATCH_NAMEKnownSend patch name
$28Q_PATCH_NAMEKnownQuery patch name
$29C_PERF_NAMEKnownPerformance name chunk
$2AS_SET_UPRATEKnownSend set module uprate mode
$2BS_SET_MODEKnownSend set module parameter mode
$2CUknown
$2DS_SEL_PARAM_PAGEKnownSend select parameter page
$2EQ_SELECTED_PARAMKnownQuery selected parameter
$2FS_SEL_PARAMKnownSend select parameter
$30S_ADD_MODULEKnownSend add module
$31S_SET_MODULE_COLORKnownSend set module color
$32S_DEL_MODULEKnownSend delete module
$33S_SET_MODULE_LABELKnownSend set module label
$34S_MOV_MODULEKnownSend move module
$35Q_VERSION_CNTKnownQuery slot patch version counter
$36Uknown
$37S_SET_PATCHKnownSend patch
$38R_PATCH_VERSION_CHANGEKnownReceive patch version changed (response to midi program change)
$39R_LED_DATAKnownReceive led data
$3AR_VOLUME_DATAKnownReceive volume indicator data
$3BQ_MASTER_CLOCKKnownQuery master clock
$3CQ_PATCHKnownQuery patch
$3DS_MIDI_DUMPKnownSend midi dump command
$3ES_SET_PARAM_MODEKnownSet performance mode of synth on or off
$3FS_SET_MASTER_CLOCKKnownSend set master clock
$40S_SET_PARAMKnownSend set parameter value
$41Uknown
$42S_SET_PARAM_LABELKnownSend set parameter label
$43S_SET_MORPH_RANGEKnownSend set morph range
$44S_COPY_VARIATIONKnownSend copy variation
$45Uknown
$46Uknown
$47Uknown
$48Uknown
$49Uknown
$4AC_MODULE_LISTKnownModule list chunk
$4BUknown
$4CQ_PARAMSKnownQuery parameter list
$4DC_PARAM_LISTKnownParameter list chunk
$4EUknown
$4FQ_PARAM_NAMESKnownQuery parameter names
$50S_ADD_CABLEKnownSend add cable
$51S_DEL_CABLEKnownSend delete cable
$52C_CABLE_LISTKnownCable list chunk
$53Uknown
$54S_CABLE_COLORKnownSend set cable color
$55S_CTRL_SNAPSHOTKnownSend midi controler snapshot command
$56S_PLAY_NOTEKnownSend play note
$57Uknown
$58Uknown
$59M_UNKNOWN_2Uknown
$5AC_MODULE_NAMESKnownModule names chunk
$5BC_PARAM_NAMESKnownParameter names chunk
$5CUknown
$5DR_EXT_MASTER_CLOCKKnownReceive master clock
$5EQ_GLOBAL_KNOBSKnownQuery global knobs
$5FC_KNOBS_GLOBALKnownGlobal knobs chunk
$60C_CONTROLLERSKnownControllers chunk
$61Uknown
$62C_KNOBSKnownKnobs chunk
$63Uknown
$64Uknown
$65C_MORPH_PARAMKnownMorph parameters chunk
$66Uknown
$67Uknown
$68Q_CURRENT_NOTEPartly knownQuery current note
$69C_CURRENT_NOTE_2Partly knownCurrent note chunk (don't know the purpose of this data)
$6AS_SEL_VARIATIONKnownSend select variation
$6BUknown
$6CUknown
$6DUknown
$6EQ_PATCH_TEXTKnownQuery patch notes
$6FC_PATCH_NOTESKnownPatch notes chunk
$70M_UNKNOWN_6Uknown
$71Q_RESOURCES_USEDPartly knownQuery resources in use (cycles and memory)
$72R_RESOURCES_USEDPartly knownReseive resources in use (don't know how to interpret the data)
$73Uknown
$74Uknown
$75Uknown
$76Uknown
$76Uknown
$78Uknown
$79Uknown
$7AUknown
$7BUknown
$7CUknown
$7DS_START_STOP_COMKnownSend start/stop led/volume message stream from G2
$7ER_ERRORPartly knownReceive error message from G2 (don't know meaning of error code)
$7FR_OKKnownReceive OK message from G2
$80R_MIDI_CCKnownReceive midi CC
$81M_UNKNOWN_1Uknown
...

Used sources and packages


SourceSite
G2 patch file structure http://dewb.org/g2/pch2format.html
G2 patch file structure, midi, module infohttp://www.iaf.nl/Users/BlueHell/
G2 USB messages,patch structurehttps://github.com/msg/g2ools
Polygon fillinghttp://www.sunshine2k.de/stuff/Java/Polygon/Filling/FillPolygon.htm
Polygon fillinghttp://www.cs.rit.edu/~icss571/filling/index.html
Polygon fillinghttp://www.malcolmmclean.site11.com/www/Bioinformatics/polygons.html
Anti aliased discNils Haeck M.Sc. www.simdesign.nl
Anti aliased diskhttp://www.experts-exchange.com/Programming/Languages/Pascal/Delphi/Graphics/Q_23502480.html
FPC Scanline alternativeshttp://wiki.lazarus.freepascal.org/Developing_with_Graphics
Cable simulationhttp://www.charlespetzold.com/blog/2008/11/Simple-Cable-Simulation.html
Cable simulationhttp://lab.andre-michelle.com/cable-interface
Cable simulationhttp://wiki.answers.com/Q/What_is_the_formula_for_catenary_calculation#ixzz1iD2bBQpF
Dlphi graphicshttp://catch22.net/tuts/flicker
Frequency calculationhttp://www.phy.mtu.edu/~suits/NoteFreqCalcs.html
Threadshttp://www.delphicorner.f9.co.uk/articles/op1.htm
Delphi DLL memory managementhttp://delphi.about.com/od/objectpascalide/l/aa103003a.htm
Delphi listviewhttp://stackoverflow.com/questions/10835355/in-place-editing-of-a-subitem-in-a-tlistview


PackageSiteUsed for
Libsub-win32http://sourceforge.net/apps/trac/libusb-win32/wikiUSB interface
FPC http://www.freepascal.org/XML reading, writing (made some changes to make it Delphi XE2 compatible
Indyhttp://www.indyproject.org/index.en.aspxNetwork communication objects
MIDIIOhttps://bitbucket.org/h4ndy/midiio-dev/overviewMidi objects
Tobybear's VST templatehttp://www.tobybear.de/Delphi VST template