
Here is some info about beta version (0.2) of the Android G2 editor I’m making. There is also a download link at the bottom of this page if you want to try it out.
The 0.1 version was about getting the USB interface working. You can read the technical details here.
In this version 0.2 i have made a lot of effort getting the performance up to an acceptable level and to add functionality and improve the user interface.
Important: To connect to a G2 synth from your Android device, your device needs to supports USB Host mode and you also need an OTG cable.
So, if your device meets these requirements, you can it connect to the G2, otherwise you can only try the application ofline. I’m using the Acer A1 810 myself, which can be bought for about 150 euro’s. Your device should have a screen size of at least 1024×600 to fit the application.
Because the USB identity of the G2 is associated with the application, there will automatically appear a message on the screen if you connect the G2 to your device:
“Open G2_mini_editor when this USB device is connected?”

Press OK and the application should start, it takes about 15 seconds to load the application.
The main screen looks like the one below, I’ll explain a bit of the user interface in a second. First you will see the green led light up as the application downloads the data, patches and so on from the G2.
You can also see the messages that are exchanged between de application and the G2 on the little log line. It ends with message “Start communication”. This is the command that starts the led and volume data stream from the G2 and is the last message in the initialisation fase.
So, about the user interface, I have tried a couple of different versions and ended up with the following. The difficulty is of course fitting all functionality on a small screen and also to keep the performance of the application on an acceptable level.
It is a tab based application, with four tabs: Perf (performance), Patch, Patch settings and Knobs. On the left there are four buttons (A, B, C, D) with which you can select the current slot.

The “Performance tab” shows the performance settings and the main settings of all four slots. It is not complete yet and not alle buttons are working at the moment, but from top-left to bottom-right the controls are the following:
- USB activity indicator led
- Synth button with the name of the connected G2. Later on you will get the “Synt settings” form if you press this button.
- Performance button with the name of the current performance. If you press this button, you can select another performance from the G2 memory banks.
- Master clock
- Master clock run button
- Keyboard split button (not working at the moment)
- Perf mode button
Then for each slot
- Patch button with the name of the current patch. If you press this button you can select another patch from the G2 memory banks.
- Variation radio buttons
- Volume slider
- Mute button
- Keyboard enable button
- Hold enable button
On the bottom there is a keyboard. This will send note-on note-off messages over USB, just like the keyboard floater in the original Clavia editor. Sadly, the G2 only supports mono-key over USB.
The application supports multi-touch (thanks to Iztok Kacin), but because of above restriction, you can’t play chords on the keyboard, this will cause one key to hang. But you can hold a key an for example move a slider or select another variation.
If you press the Performance button or one of the Patch buttons, the “Patch select” window appears, which looks like this for now.

On the left the banks with patches on the right the banks with performances.
The second tab on the main screen is the “Patch tab”. It shows a simplified representation of the patch in the slot selected on the Slot selection buttons on the left. So in this case it is the patch of slot C, in the VA section.
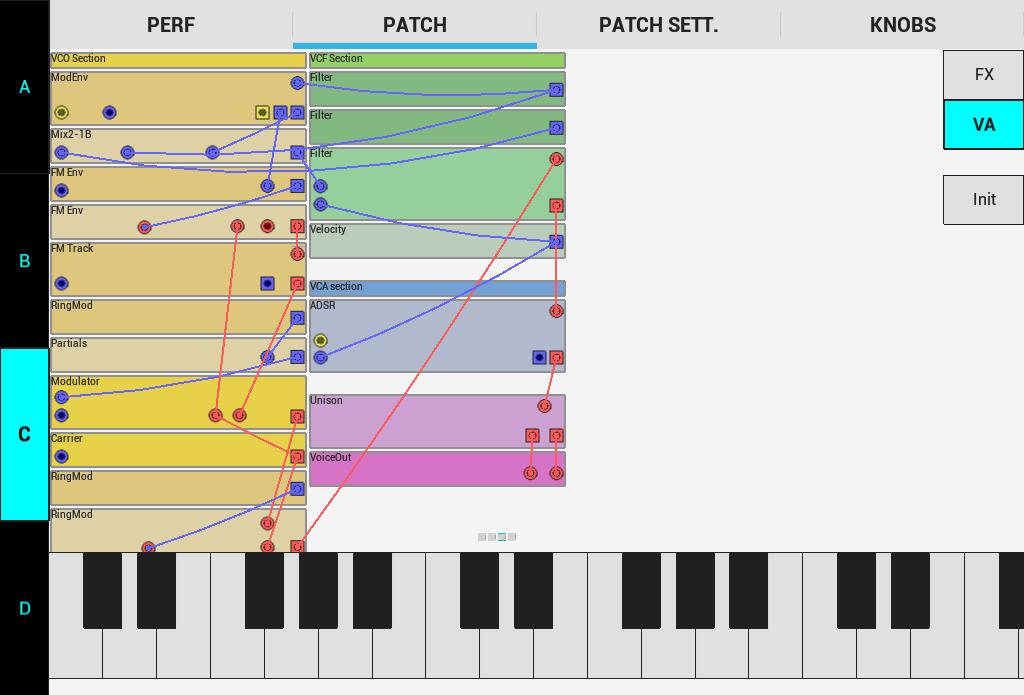
You will notice that only modules, connectors and cables are shown. That is to speed up rendering of the picture and also because the controls would be much too small to edit.
It is still a bit slow, which will be evident if you play the keyboard in this screen. It has a distinct lag, so some work still to do here.
If you tap on a module, that module is shown full screen. Here you can edit the parameters of the module.

In future you will be able to add/delete modules on the patch window and probably add cables. But that is another user interface challange I haven’t started on yet, maybe in the next version.
The third tab is the “Patch settings” tab. This will be familiar from the original Clavia editor. You select the active slot with the “Slot selection” buttons on the left.

The last tab is the “Knobs tab”. This should also be familiar.

So that is basically all for now. If you want to try out this version you can download it here. It is only a beta so be aware that is contains bugs and also functionality is not complete.
For installation, just extract the apk from the zip and install it on your Android device.


